Garden Apron

I am growing a garden right now. It is such a fun and rewarding experience, besides the weeds. It is something that takes good work with pretty immediate rewards. I love to have the kids work with me. We plant a seed, it grows, and they know where our food comes from.

As I was out there working, I kept wiping my wet hands on my clothes. I knew I needed a Garden Apron. I copied the top neck-line of the Lotta Apron but then the arm holes and sides are different - not so close to the armpits and not wrapping all the way around your back. I added a pocket with the cutest little ball trim ever! I'll be using more of that stuff in the future!


This apron also looks cute with the ties going around the waist twice and tied in back. The pocket really is the key to the usefulness of this apron.

Long Cafe Apron

I've been wanting to make a long cafe apron with a wide band. Here it is. I love the combos of fabric here. Be adventurous in your experimenting. I found the bottom piece and loved it. I think it was the perfect accent for this apron. Follow the same intructions for the regular cafe apron, however cut the waist band twice as wide. As for the body pieces, cut two that equal the length of the bottom and then sew them all together. Fit the whole apron together the same as the typical cafe apron. This apron fits more at your natural waist then at your hips.

Lotta Apron


This was a fun apron to make. I've decided I really like reversible aprons, they're so clean looking after you're finished. There is no unfinished edge. They are also much easier than they appear. Sewing two basically finished aprons together just takes a couple of pins and some edge stitching, nothing to sweat about. If you need cheering on, just ask, I'll gladly give it.

I love love love the neck line of this apron. When I saw it, I immediately knew that I'd be making this one. I love the little pleat on the top of the body where the neck ties connect. Such a good idea.

The other reason I love this apron is the embroidery. I hadn't done embroidery on anything before. I loved doing it! It was such a relaxing activity. I'm definitely going to be doing more one future things.

This comes from a book by Lotta Jansdotter. Thus, this is the Lotta Apron. This was a friend's book she purchased from Borders. It comes with the pattern pieces for the apron. It has so many other cute ideas in it as well. I recommend it for everybody.


The back of the apron wraps all the way around and I really like that it's a little bit shorter than other aprons. It covers you're entire body. It will be a great baking apron!

Here's both sides. So cute!


Green Mac & Cheese

I know this dish doesn't look stunning, but at least it's healthy.

If you're looking to make you're life more green, besides recycling your cardboard and cans, try green foods. Not only are they healthy, they will give your kids a new view on food.

I love to make my own mac and cheese. I think of it more like cheesy noodles. I've never tasted homemade mac and cheese that actually tastes like store-bought. So if you're expecting store-bought, you'll be disappointed. If you are expecting cheesy and comforting, you'll be satisfied.

The recipe is simple. This makes a 9x13 pan.

Make a rue:
3 Tbsp butter
3 Tbsp flour

Mix and cook for a couple of minutes in a sauce pan. You don't want the flour to burn.

Add 3 cups of milk. If you want to cut calories, add 1/2 milk and 1/2 water.

Whisk all together to break up flour and butter within the milk. Add shredded cheese of your choice: mozzerella, cheddar, Romano, pepper jack, etc. A little of several flavors tastes best. Keep taste-testing until the desired cheesiness is acquired. If you want to give it a hint more of heat, add some crushed red pepper and/or a little paprika.

You'll also need to salt and pepper to taste. A pinch of nutmeg in the rue is a mysterious deliciousness.

Now it's time for veggies: To make is really green, pulse spinach in a food processor until smooth and add to the rue. You can also add peas, thinly sliced and diced carrots, and diced sweet peppers. There's lots of options.

Cook 1 lb box of pasta according to directions. Once the pasta is finished, combine all this into a 9x13 dish and sprinkle with more grated cheese and bread crumbs.

Cook at 350 until cheese is melted on top and bread crumbs are golden.

Honeymoon Apron

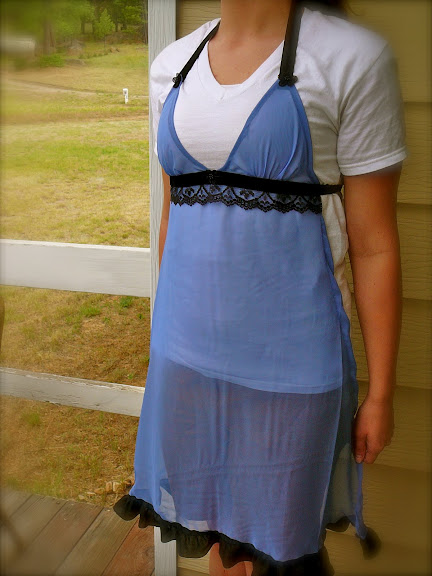
This was a fun one to make. My sister is getting married and I decided to mix the bedroom and kitchen into one gift. I'd been thinking of this idea for a while. It turned out well. The material takes some getting used to, but worth it.

I cut one large bottom piece to the size I wanted. (It would be cute to have a wavy bottom). I then cut 2 triangles of the same material. I folded the outside edges of the large body piece and triangles over twice and hemmed to prevent fraying. Using pins is a must with the slippery fabric. I used black velvet in one long strip for the ties and to attach the bottom piece (with ruffle edge attached and lace at the top) and triangles onto. For the triangle tops, I gathered the middle of the bottom into several small pleats before adding to the middle velvet ties. Pin in place. I attached velvet ties to the top of the triangles for neck ties and then embellished it all with some simple hand-sew black flowers on the top of the triangles and right in the middle. When making the triangles, measure half the length of the top of the large bottom piece and make the bottom of the triangle 1 1/2 that length to leave room for gathering. Or just keep in mind the bust size of the person you're making the apron for. It's one of those aprons that it doesn't really matter what size you are.

I think it would be fun to make another Honeymoon Apron that is a 2-piece: a cafe apron bottom and triangle top. Have fun!


Pavlova

Ingredients:

4 egg whites
a pinch of cream of tartar
1 cup granulated sugar
1 teaspoon cornflour (corn starch)
1 t white wine (or champagne) vinegar
1 t vanilla essence (or scrape the seeds from a dried vanilla pod.)

About ½ pint heavy cream, whipped
fresh fruit

Method:

TIP: Ensure your oven is preheated for at least 10 mins before cooking. Have all your ingredients measured and laid out before you commence. Eggs should be at room temperature and carefully separated, with no trace of yolk. Maybe make some chocolate pots de creme or sauce sabayon or mayonnaise with those yolks…

Whip egg whites and cream of tartar, building to high speed, until they are stiff and soft peaks form. Gradually add the sugar, a little at a time, beating well to dissolve each addition. Add the cornflour with the last amount of sugar. Meringue will be smooth and glossy. By hand, gently fold in the vinegar and the vanilla, lifting as you go to preserve the fluffiness of the meringue.

Use a sandwich tray, covered with lightly greased baking paper. Pile the meringue in the middle of the tray, shaping the mixture into as high a dome as possible after spreading in about a 12-inch oval, or pie shell shape, as preferred.

TIP: Meringue will expand a little bit and crack as it is cooking. It may also sink a bit in the middle once cooled, but that’s the part you fill with cream, anyway.

Cook at 250 degrees for 1 & ½ hours. Turn off heat and let cool in oven for a further two or so hours.

Once cold, decorate with whipped cream (lightly sweetened with powdered sugar and vanilla essence) and fruit. Also good to sprinkle with chocolate chips.


*Recipe from my friend Lisa - a true Aussie.

Basic Child Apron

This is the first child apron I've made. I made my own pattern by using a large piece of paper, folding it in half, drawing a basic pattern, and cutting it out. Pin the opened pattern on the material or keep it folded and pin it on the fold of the material and then cut. Look at a store bought typical apron for a basic pattern. I added a pocket and bottom strip in the light blue. After hemming the sides, I added ribbon to the sides and each corner on the top for strings to tie around the waist and neck. This would be a perfect size for a 1-2 year-old. For this particular apron, I should have made it a bit longer and wider to fit a 3-4 year-old.
Related Posts Plugin for WordPress, Blogger...